
RICH SKIPWORTH’S TIPS, TRICKS, AND NERDY TECHNO-BABBLE
This article first appeared in The Jester issue 466.
I am a Cartoonist these days. But before I was a cartoonist I was a Graphic Designer, and before that I was a Frozen Mackerel Packer. I am often called upon to combine the first and second of these skills when I produce work for various giftware companies. (No call yet for freelance cartoon mackerel packing graphics though…ah well.) Part of my giftware design job involves producing posh visuals to clients to persuade them to part with money. There’s a handy Photoshop filter that makes the design of packaging and products much easier. It’s the little known Vanishing Point Filter, and it’s dead good.
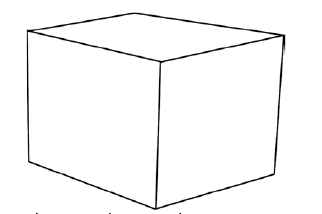
The Vanishing Point Filter in Photoshop is a means of applying graphics to your illustrations in perspec-tive interacively. It’s handy for applying lettering or logos to angled surfaces in a convincing way. Suppose you want to apply some logo or image to a simple shape. First, draw your simple shape:
Next, draw your logo or whatever you want to apply to your shape:
Next, select and copy that logo. Then deselect it.Then, the interesting bit….from the Filter menu at the top of your screen choose Vanishing Point.
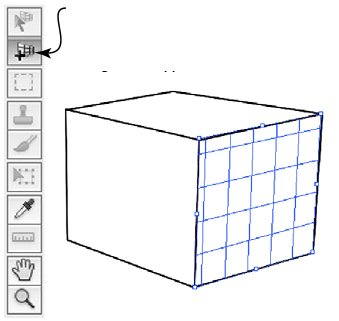
Your screen changes, and you are presented with a new window with a spartan set of tools at the top left. Your simple shape is visible. You have now entered the mysterious Vanishing Point mode.
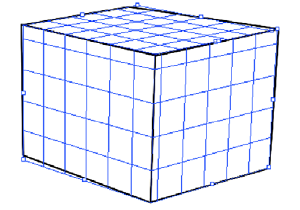
Select this tool from the palette and then click one corner at a time on a face of your simple shape. After three clicks, a blue grid will appear:
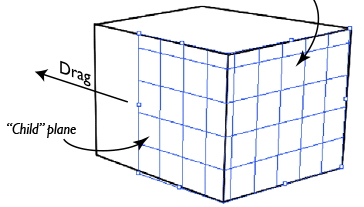
Now position your cursor over a mid point marker of the grid and hold down the Cmd key on a Mac or the Ctrl key on a PC. The cursor will change to an arrow with a small grid next to it. Click and drag.Magically, the grid is extended perpendicular to the original (or “parent”) plane.
Repeat the process to complete the grid over the visible surfaces:
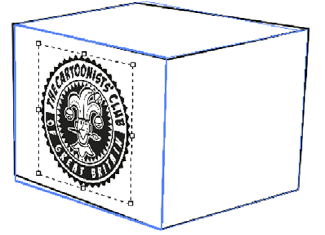
Next, paste your logo that you copied earlier. The blu grids will change to big blu rectangles, and your logo will appear top left of your screen with a selection marquee around it. Press Cmd T (on a Mac) or Ctrl T (on a PC). This invokes the Free transform command which gives little control points at the corners of that marquee. Click on one of those points, hold down Shift and drag to resize your logo. Make it quite small. Then release the Shift key and drag the logo onto your formerly gridded up shape.
When the logo coincides with one of the faces it will be distorted into the correct perspective for that face:
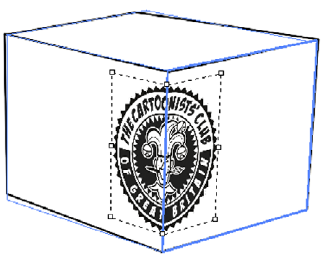
Now try dragging the logo onto another face. As the logo crosses the join between faces, it once more is distorted to match the perspective:
Holding down the Alt key while dragging allows tou to copy the logo as you drag, allowing you to build up a patterned surface:
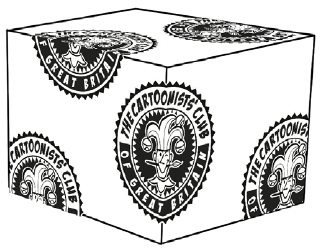
When you’ve finished adding and distorting logos and graphics, click OK and you’ll exit the Vanishing Point mode and return to normal with your distorted artwork now in place.
I’ve cheated a bit in this tutorial… I arranged things so that my original shape actually was in perspective to start with which meant the Parent/Child plane thing worked easily. You may have shapes which don’t have their faces at right angles to each other. You can simply not bother with generating Child planes and simply click and create an entirely separate planes all over your shape. The logo will still distort as before but it won’t flow around corners. There is a further trick up this filter’s sleeve though. Select the topmost tool in the palette this time. Now when you hover your cursor over a Parent plane’s mid point marker, hold down the Alt key. (Just click a plane first to make it active)
This time the cursor will change to a double ended curved arrow. Then click and drag while keeping the Alt key depressed and the Child plane can be rotated as if it was hinged along the Parent plane. This is dead handy for matching non rectangular shapes.
Here’s a few Top Tips for this Vanishing Point malarkey:
- If you make a mistake while setting up a plane, hit the Backspace key and your last plane corner point will be deleted.
- Create and select a new blank layer before you enter Vanishing Point mode. Then any artwork you create in that mode will appear on it’s own separate layer when you click OK and return to normal mode.
- When you select a Vanishing Point tool, check the little panel near the toolbox and you’ll see a line of info telling you (roughly) what that tool does and how to use it.
More nerdiness next ish!
No comments yet.