
This drawing by Ross Thomson is my top pick from the September issue of our house magazine The Jester

This drawing by Ross Thomson is my top pick from the September issue of our house magazine The Jester

This is my top pick from the current issue of our house magazine The Jester

I use social media mainly as a broadcast channel, publishing cartoons on their own on a daily-ish schedule for the entertainment of my small following and hoping to get the odd ‘like’ or retweet. But sometimes people add comments. Comments tend to fall into four categories:
It’s difficult to know how to respond diplomatically so I usually just delete any comments as soon as I see them, even when they are from people I know well. Facebook does not allow you to globally suppress commenting other than by uploading a list of banned words, which I have now done using the commonest words in the English language.
Perhaps the strangest comment recently was attached to a cartoon whose essence was the phrase ‘bilge-watching’ in place of ‘binge-watching’. Although it got a number of ‘ha-ha’ responses, it did also get one comment, asking whether ‘bilge’ was a mistake. I suspect the commenter was American and not familiar with Midsomer Murders.

How often have you had a cartoon rejected, only to see someone else get the same idea published? It happens all the time and usually purely by chance because, after all, great minds think alike. But it cuts both ways. You can be sure that someone is shouting at the internet or apoplectic with rage at a magazine because you got “their” idea published when they didn’t.
The brilliant KJ Lamb is probably irked because Private Eye published my “Quantity Street” drawing after The Oldie had printed her version of the same gag. Pure coincidence (I don’t take The Oldie) and I was mortified when I later realised what had happened. Even more so when my version got a second outing in the Private Eye Annual.
Anyway, it probably evens out in the end and sometimes two or more people get paid for the same idea. Notably my ‘Brazilian Butt Lift’ drawing got into last May’s Eye, only to reappear in another guise in that selfsame organ a few weeks ago. Call it a ‘draw’.

Like I suppose a lot of people must do, I just started sending unsolicited drawings to magazines in the hope that they would publish them (which to be fair, after 40 years of trying, they did). But then it emerged that my most important client publication has some very firm views about what else I can do with work they publish, which slightly limits my freedom. I don’t want to argue with them because the limitations aren’t severe, they are pretty accommodating when I ask for clearance to reuse the drawings in other contexts, and they pay well anyway in the first instance. But it raised a bigger point: I suspect that it is very rare for publications to inform would-be contributors of their terms and conditions for the use of unsolicited material, so in effect they don’t form part of the contract that comes into being when we submit work and they pay us. Because it’s a buyers’ market and publishers are bigger than us, we could end up defenceless if they claim more than just the right to reproduce our work once in a print edition. They could just wave their (previously-undisclosed) terms and conditions at the judge or arbitrator.
To try to deal with this issue, I wrote a default set of terms and conditions (see below) which is published on my web site and all my email correspondence has a link to it in the signature block. This should in theory put the publisher on notice that they can’t play fast and loose with my intellectual property. And should a case ever go to court, I feel I’d be in a stronger position, because the publication’s terms and conditions shouldn’t take precedence if I’ve shown them mine but they haven’t shown me theirs.
So for what it’s worth these are my published terms and conditions:
I understand that publishers of print media such as magazines may wish to use material that I have submitted unsolicited, and it will not usually be practical to agree the full terms of an individual contract at short notice if at all. Publishers may or may not have standard terms and conditions of contract which may or may not comprehensively cover rights and I may or may not be aware of them if they do exist. This page explains the default conditions which I will apply in the absence of written agreement to the contrary.
Definitions
‘Me’ and ‘I’ mean Vilnis Vesma known also as Vilnissimo. ‘The work’ means a literary or artistic creation of which I am the author. ‘Publisher’ means a person reproducing any such work or contemplating its reproduction.
Jurisdiction
Publication of the work will have the effect of creating a contract between the publisher and me under English law unless such a contract already exists.
Reproduction rights
Subject to a consideration which I deem sufficient the publisher will enjoy, for the full term of copyright and any extension thereof, a non-exclusive licence to reproduce the work on one occasion world-wide in one form.
Moral rights
I assert my right to be identified as the author of the work. Pseudonymous attribution to “Vilnissimo” will be sufficient.
Subsidiary rights
I retain the right to reproduce the work in any other form.
Competing works
I undertake not to license any reproduction of the work in the same form by any competitor of the publisher for a period of three years from its first use by the publisher.
First appeared in Issue 542 of The Jester, June 2020
Like most painting and drawing software, Clip Studio comes equipped with a Paint Bucket Fill tool, useful for filling areas of your illustration with flat colour.

Clip Studio’s paint bucket (or Fill tool as it’s referred to in Clip Studio) has a useful feature that I stumbled upon recently: it can make use of a thing called a “Reference Layer”
When you select the Fill tool, you should see the default Sub Tool [Fill] panel pop up. If not, go to the Window menu at the top of the screen and select it from there. It looks like this:
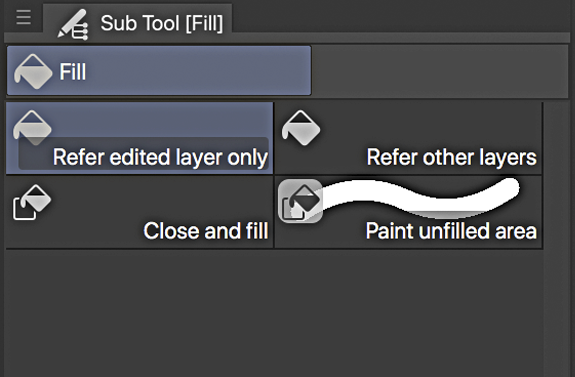
The default Fill tool is the “Refer edited layer only” which will only fill colour into closed areas on the layer those areas are on. So if you draw a square on Layer 1, the Fill tool will only fill that square on Layer 1.
Normally, you’d want the colour to be filled on a different layer, ie if you had your linework on one layer, you would like to use the fill tool to add colour on another layer below the linework layer, but using the linework layer as the layer that controls where the fill takes place.
You can achieve this by selecting the “Refer other layers” option his Fill tool version responds to the presence of shapes and lines on all the other layers in your artwork, so you could create a layer below your linework, click in the linework layer and the fill colour would appear on the layer below.
But there are times when you could do with a little more control than this, and sure enough Clip Studio, with its seemingly obsessive attention to control detail, provides this.
With the Refer edited layer only Fill tool selected, go to the Window menu and select Tool Property [Refer edited layer only] The Tool Property panel appears:
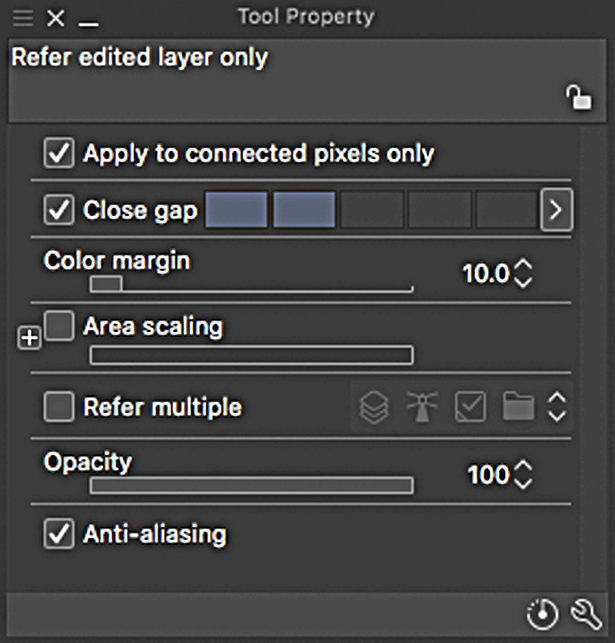
Click the little checkbox in the Refer multiple section and some new icons appear. Click on the little symbol that looks like a lighthouse:
This is the Reference Layer icon. When this is selected, the Fill tool will now only respond to the shapes and lines on a layer designated to be the Reference layer. You can fill on any layer, but the tool will take its instructions from the Reference layer.
You can designate any layer to be your reference layer by going to your Layers palette, selecting a layer, and then clicking on the lighthouse icon in that palette:

Typically, your linework layer would be the reference layer, but it could be any one you choose.
You can only have one Reference layer active at a time, and it will be indicated by a lighthouse icon next to its name in the Layers palette.
Another setting that is useful to have for this version of the Fill tool is the Area scaling setting. Click the little checkbox in that section to activate it, and set its value to 2.
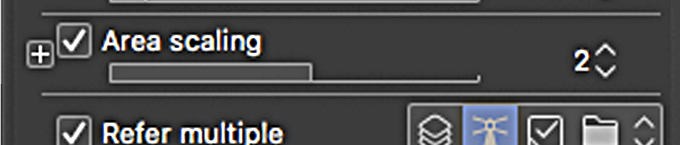
What this setting does is to expand the area that the fill will occupy once it reaches the edge of an enclosed area. So in this case, once you click in an enclosed area on the reference layer with the layer below it active (ie the colour layer) the fill will not just fill the area you’ve chosen, but will extend itself by a further 2 pixels. This means that there will be no annoying white gap between the edge of the fill and the edge of the linework shape.
The fill has a 2 pixel “bite” into the linework edges.
Bigger positive values will give more bite, but you can apply negative values too, which will generate a gap between the linework area and its fill. (sometimes you want that effect).
Click on the little + icon to get options on how the corners of the fill appear.
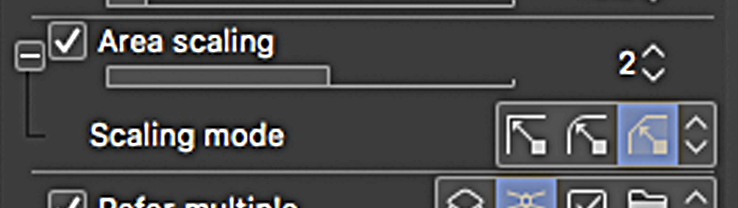
Options for the types of corners of the fill

Now you have altered the settings of the Fill tool, it no longer behaves like its old self. But you can revert the settings back to the default by clicking on the icon
next to the spanner icon at the bottom right corner of the Tool Property panel. Before you do that,
you might like to create a copy of your altered Fill tool for future use. Just click on this icon at the bottom right corner of the Sub Tool [Fill] panel
A panel will appear giving you the option to rename this copy and even give the new icon a colour. (There are numerous other options you can tinker with too if you have a couple of hours to spare).
When you’ve done that, return to your original Fill Tool and revert its setting back to the default.
Alternatively of course, you could have made the copy first and then altered the settings.
There is another default tool in the Fill Tool panel that is a really
nifty one. I haven’t seen its like before. It’s the Paint unified area tool.
Sometimes when you’re using the Fill Tool to fill a shape that has some really awkward narrow sections, the fill will often not go completely into the extremes of these narrow bits.
You get left with an annoying gap that you usually have to correct with careful application of the Brush Tool
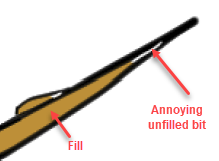
To fill in these annoying gaps, Select the colour layer your fill is on, then choose the aforemen- tioned Paint unified area tool. Place your stylus tip onto an area of the succesful fill colour and without lifting your stylus simply scribble over the unfilled area.
The tool leaves a trail like a green highlighter marker while your stylus is in contact with your tablet .
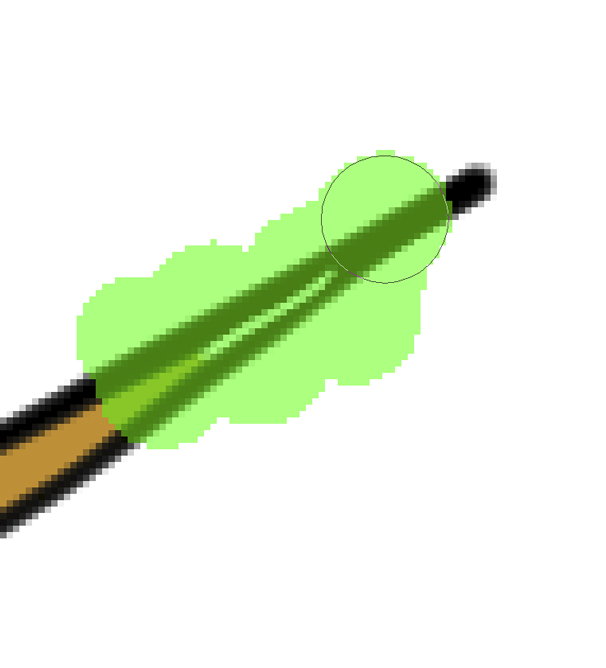
When the whole unfilled section is covered, lift your stylus from your tablet (or screen if you’re drawing direct onto one). The green highlighting will disappear and that annoying unfilled area will be filled!
Whoa! Awesome!
More nerdiness next month chums!


